All posts by Lauren Bolanos

Carrot and Beet Flax Crackers

Carrot and Beet Flax Crackers - Healing and Eating

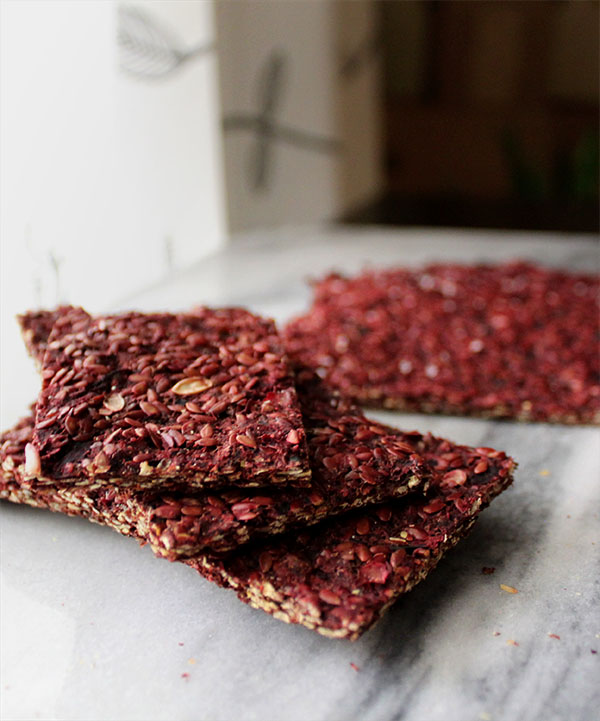
I was looking for a way to use my juice pulp, from the beet, carrot, and cucumber juice I made, so I thought a raw flax crackers would be fun to try to make.  I’ve only used flax meal before, so using the whole flax seed, was a different but good. They came out more crispy then just the ground flax meal. I tried to ground the flax in the food processor, but that didn’t work well. For the juice, I used 4-5 beets, a half a bag of carrots and two cucumbers. I’d say that yields me about 4 cups of pulp. In the future I might add more seasoning to the crackers, but for now I’ll plan to eat it with some delicious dip.

Carrot and Beet Flax Crackers
 
Prep time
Cook time
Total time
 
Serves: 2 sheets
Ingredients
  • 4 cups of juice pulp (carrot, beet, & cucumber)
  • 1.5 cups of golden flax seeds
  • 1 tbsp sea salt
Instructions
  1. Mix pulp and flax seeds in a bowl
  2. Line dehydrator with parchment paper, on two levels for each clean up.
  3. Spread mixture over parchment paper.
  4. Sprinkle with sea salt.
  5. Let turn dehydrator on to 105 degrees fahrenheit, and let it run until it's completely dry, preferably overnight.
  6. Then cut apart crackers with a kitchen scissors.
Notes
Feel free to experiment with spices and/or fresh herbs.
Nutrition Information
Serving size: 4-6

Honeymoon Part 1: Monterey

I wanted to share with everyone some of the fun and healthy tourist stuff Shameer and I did on our honeymoon. We drove up the Pacific Coast Highway, and stopped in Santa Barbara for breakfast, then we continued on to Monterey Bay. When we were there, we went to the Aquarium, and did the Jellyfish tour.

Jellyfish - Healing and Eating

The food court at the aquarium had some healthy options. I got a vegan salad from their salad bar and a bunless grass-fed burger, then I put the burger on top of the salad. I also got my own container of water, that was packaged like a small milk carton, instead of plastic, which I thought was pretty cool.

Then on Cannery Row, located right next to the aquarium, we went to Monterey’s Tasty Olive Bar, where you can sample different olive oils and balsamic vinegars infused with herbs. We got a garlic infused olive oil for easy salad dressings and an organic olive oil that tastes like butter. There’s no dairy in it, it’s just herbs, and since I miss butter, I was crazy excited about this. You can buy their stuff online if you like. I think it would make a nice gift for a fellow foodie.

Olive Oil Tasting - Healing and Eating

When we were staying in Monterey, we stayed at a cute B&B called the Old St. Angela Inn. They were very accommodating about my dairy allergy, and made a different breakfast for me in the morning. Plus, it was walking distance to the stores and restaurants down the street.

While we were in Monterey, we drove up to Carmel Valley to taste to the organic wine from Heller Estate.

Heller Estate Tasting - Healing and Eating

Then, we stopped at the Earthbound Farms Organic Farm Stand for lunch. They were small, but they had a lot of good specialty food items, fresh produce, and plenty of outdoor seating.

Earthbound Farm Stand - Healing and Eating

To be continued …

Almond Blackberry Panna Cotta

Almond Blackberry Panna Cotta - Healing and Eating

I have a gigantic bag of frozen blackberries currently taking up way too much space in my freezer, so sorry for all the blackberry recipes this summer. Anyway, I’m a big fan of gelatin. I made a lot of gelatin desserts when my blog first started, but I got into a pie frame of mind for while. I wanted to revisit this technique, just kidding, pinterest made me crave dessert. This was delicious, but I had issues with the homemade almond milk separating. I read if you add more gelatin or if you let the liquid get to room temp then whisk before pouring in the bowls it helps with that issue, plus I blended in blackberries too. I can’t tell you which one worked, but they did and dessert was saved!

Almond Blackberry Panna Cotta
 
Prep time
Cook time
Total time
 
Ingredients
  • 2¼ cups of water
  • ¼ cup of almonds
  • 3 tbsp grade b maple syrup
  • ¼ tsp sea salt
  • ½ tsp almond extract
  • 1 tsp vanilla extract
  • 2¼ tsp great lakes gelatin
  • 1 cup blackberries
  • cheesecloth
Instructions
  1. Blend 2 cups of water with almonds, maple syrup, sea salt, almond and vanilla extract.
  2. Strain through cheesecloth.
  3. Mix ¼ cup of water with gelatin, then heat both mixtures over stove until you start to see steam. Don't boil.
  4. Then add back to Vitamix and blend with blackberries.
  5. (optional) Let it get to room temp and whisk before adding it to bowls. This will help stop it from separating.
  6. (optional) Strain out blackberry seeds.
  7. Refrigerate for a couple hours or rush it through the freezer for a half hour.
Notes
I prefer to refrigerate for at least three hours.
Nutrition Information
Serving size: 4

Basil and Arugula Pesto

Basil and Arugula Pesto - Healing and Eating

When I was a raw vegan, I used to buy the raw basil arugula pesto from the Santa Monica Co-op and eat it by the spoon. This was my attempt to make my own version, although it turned out a bit less creamy and a bit more garlicky, which suits me just fine since I love garlic. If I start to get sick I normally eat some chopped raw garlic with honey, but I might just make this instead, since it tasted so delicious. It will definitely make the garlic go down easy.

I love cucumbers for dipping, but this would also go great with some fresh summer tomatoes. Yummmm.

Basil and Arugula Pesto
 
Prep time
Cook time
Total time
 
Ingredients
  • 3 cups of basil
  • ¾ cup of wild arugula
  • ½ cup of pine nuts
  • ½ cup of olive oil
  • 3 cloves of pressed garlic
  • 1 tsp sea salt
  • 1 tsp black pepper
Instructions
  1. Combine ingredients in food processor and pulse until roughly blended.
Notes
Double the pine nuts for an extra creamy pesto without the cheese.
Nutrition Information
Serving size: 4-6

This recipe is hosted on Paleo Magazine’s Link Party

Easy Peel and Eat Shrimp

Easy Peel and Eat Shrimp - Healing and Eating

It’s kinda crazy how easy this is to make, which I love. Plus, my husband loves it when I make this for dinner so we are both happy. I’ll admit, I use a short cut and buy an amazing spice blend from Frontier called Seafood Seasoning  (the original with real sea salt). It tastes amazing and it’s all organic so I’m okay with it, and I throw it over the shrimp after I steam them and they taste soooo good. My husband loves this seasoning so much he threw it over the steamed broccoli as well. Not joking.

Easy Peel and Eat Shrimp
 
Prep time
Cook time
Total time
 
Serves: 12 jumbo shrimp
Ingredients
  • 12 jumbo shrimp
  • 1 tbsp Frontier Original Seafood Seasoning (or more to taste)
Instructions
  1. Steam shrimp until pink for about 3 minutes.
  2. Season with seafood seasoning.
Nutrition Information
Serving size: 2

Slow Cooked Indian Chicken Soup

Slow Cooked Indian Chicken Soup - Healing and Eating

It’s no surprise that I love my slow cooker. My top three appliances that I use the most would be my slow cooker, food processor, and Vitamix. It’s hard to say which I use the most, but I love my comfort food, and soup is my favorite kind of comfort food even in the summer. It’s just a bonus that it happens to be healthy too 🙂 I made this with bone-in skin-on chicken breasts for the shredded chicken and pastured chicken feet I brought back from my mom’s favorite farm in New Jersey. The chicken feet add gelatin, which makes this dish crazy good for your health so don’t skip it! Trust me your hair, skin, and nails will love you.

You could also skip the chicken breasts and carrots and just drink this as a bone broth with your favorite mug. The herbs used to flavor the broth are all anti-inflammatory, so it not only tastes great but they all have added health benefits as well.

Slow Cooked Indian Chicken Soup
 
Prep time
Cook time
Total time
 
Ingredients
  • 1 lb of chicken feet
  • 2 bone-in skin-on chicken breasts
  • ¼ tsp black peppercorns
  • 2 cinnamon sticks
  • 5 cloves
  • 12 cups of water
  • ½ white onion diced
  • 1 tbsp sea salt
  • ¼ tsp tumeric
  • ½ tsp teaspon crushed garlic
  • 2 cloves of garlic halved
  • ½ tsp crushed ginger
  • 2 slices of ginger
  • 1 small carrot (for slow cooker)
  • 3 carrots (per bowl of soup 18 total)
Instructions
  1. Throw all ingredients into slow cooker.
  2. Cook on low for 12-14 hours
  3. Remove and shred chicken breasts, set them aside.
  4. Strain out broth, set aside.
  5. When ready to eat soup, chop carrots and cook in broth until desired firmness approximately 15 minutes on stovetop on low.
  6. Add in shredded chicken.
  7. Season with fresh ground black pepper and sea salt to taste.
Nutrition Information
Serving size: 6-8