
New Year’s Resolution 2014 – Workout Tip Jar

I’m not the biggest fan of New Year’s Resolutions, as I’m always trying to improve my healthy lifestyle. But it is a good time for reflection on what we did right, and what we slacked in this year.

On a positive note, I’m really happy with my diet. I’m maintaining a healthy diet without losing weight, which means it’s sustainable. Most people view dieting as temporary deprivation, which is, why they yo-yo instead of looking for a long-term solution. I eat mostly paleo, although I do occasionally have small amounts of rice. I eat a lot of fat, and try to stay away from sugary food. Although, I do indulge on desserts on occasion, which I make or get from health food stores. My hair and nails are strong and grow like crazy, my skin loves it when I eliminate sugar, and dinners are more satisfying so I’m less likely to eat dessert. This past year I’ve tried raw vegan, vegan, gluten and nightshade free, and gluten and dairy free diets. I still avoid gluten and dairy, especially diary as I get flu-like symptoms from it.

On the down side, I’m not good at maintaining my exercise routines. I used to play soccer before I injured myself in a women’s league in Pasadena, and enjoy the structure of being on team. With my neuropathy, I prefer not to risk contact sports, as the last thing I need is an injury. I also have to be very careful when I do my physical therapy approved exercise routines so they don’t aggravate my arms. This makes for a very boring time at the gym, if that’s even possible. I don’t even have the added motivation to lose weight since my diet makes that unnecessary. So, I need to motivate myself properly this year, so that I will suck it up and get my ass to the gym. I found this cool image on pinterest (sorry the link was dead) that I’ve been meaning to try with this caption, “Workout tip jar. After each workout, tip yourself $1. After 100 workouts, treat yourself to new shoes or clothes or massage…” So hopefully the thought of going shopping this year will bring me to the gym. Cute jewelry that I definitely don’t need, here I come! No practical items, it decreases the motivation. This is supposed to exclusively be a reward.

I would love to hear what everyone is doing for the New Year. Feel free to leave a comment. Best of luck this year! Remember if you break your resolution, don’t quit, just do better tomorrow. We all have good and bad days.
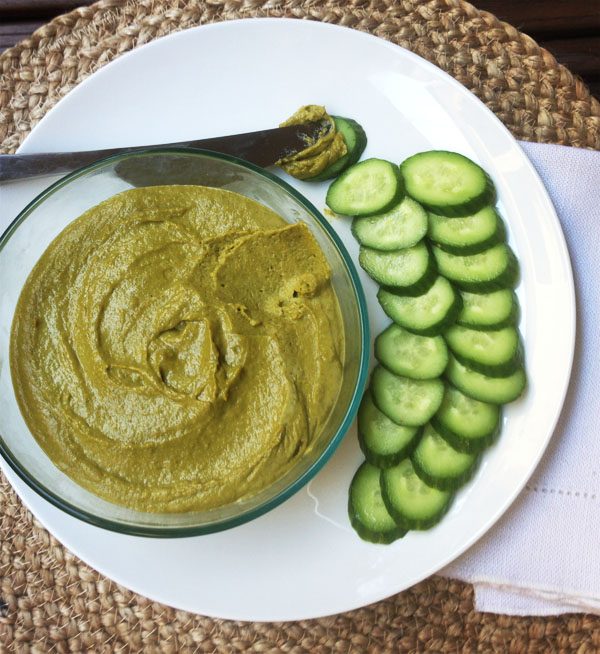
Lemon Cilantro Cashew Kreme Cheese Dip


I’m really proud of this recipe because I made raw cashew butter for the first time with my new food processor, which I love love love! This blog post by The Healthie Foodie has great pictures that walk you through how to make your own raw cashew butter in a food processor. Trust me, you need the pictures. Then, I added my leftover green chutney I had in the freezer. Since the chutney wasn’t fresh, it was a bit less spicy, which is a good thing since I’m bringing this to a new year’s party and everyone has different spicy preferences. The main ingredients in the chutney are cilantro and lemon juice, and the cashew butter adds a rich fatty texture and tangy flavor that resembles cream cheese. Whenever I’m eating a rich fatty dip, I like to use a cucumber slice for a refreshing contrast and because they have a nice a crunch.

Lemon Cilantro Cashew Kreme Cheese Dip
 
Prep time
Cook time
Total time
 
Ingredients
  • 4 cups of raw cashews (or 1 bag from trader's joe)
  • 1.5 cups (I used a liquid measuring cup) of green chutney
  • 3 cucumber chopped
Instructions
  1. Add cashews to food processor, first it will turn into cashew meal/flour, then as more oil is released it will form a dough ball. Break up ball and keep processing until more oil is released, repeat until it becomes creamy.
  2. Add green chutney to food processor, blend until smooth.
  3. Chop cucumbers for dipping.
Nutrition Information
Serving size: 10-12

This post is in Healing with Foods Friday.

Basic Butternut Squash Soup

I happen to love butternut squash and think it tastes delicious by itself, with a little love from fresh ground black pepper and sea salt. Feel free to add your own flavors or ingredients. Sometimes, I also add in a white onion to bulk up the soup cheaply, add more nutrition (sulfur!), and because I’m crazy about onions. If you haven’t noticed, I add them to everything. Popular ingredients I’ve added into this soup at one point or another are cayenne pepper for spiciness, maple syrup or apples for sweetness, and apple cider vinegar for a tangy acidic flavor. I kept this soup strictly butternut squash, because it’s an awesome vegetable that really doesn’t need a lot of help to taste delicious. Feel free to experiment and let me know how it turns out.

Basic Butternut Squash Soup
 
Prep time
Cook time
Total time
 
Ingredients
  • 2.5 cups of chopped butternut squash (trader's joes)
  • 1 cup of water (stock or bone broth if available)
  • 1 tsp of sea salt
  • 1 tsp of fresh ground black pepper
Instructions
  1. Steam and boil in liquid until soft about 20 minutes.
  2. Blend in Vitamix, or use immersion blender.
  3. Add sea salt and fresh ground black pepper to taste. Add other spices if desired.
Notes
I kept the amount of liquid small so this soup recipe is very thick and could pass for baby food. Keep in mind, it's easier to add liquid, than to take it out.
Nutrition Information
Serving size: 1-2

You Know You’re a Health Nut … When Part II

If you haven’t checked out the first part, I highly recommend it.

You know you’re a health nut

… when your heavy purse feels like it has bricks but it’s just a bag of apples.

… when you’re forced out to dinner you adjust the restaurant’s menu.

… when you wipe down your airplane seats with sanitizer wipes (it works!)

… when your family gets a grocery list for your special food before you visit.

… when you bond with your brother over his latest juicer.

… when all your food tastes like coconut oil.

… when your instagram is filled with food pictures.

… when you take home locally sourced offal in your luggage.

… when it takes at least thirty minutes to explain your diet.

… when your pinterest looks like tastespotting for diabetics.

… when your own health jokes leave everyone else confused.


Dairy and Grain Free Thumbprints with Coconut Sugar


For Christmas, we usually make this Thumb Print Cookie Recipe – from Favorite Recipes From Our Best Cook by Josephine Quagliana. This is an old cookbook from Nonny, my Italian grandmother, who gave this cookbook to my mother. My mom and I use this cookbook every year to make Christmas cookies. My mom and I decided to make an adapted version of this recipe that is gluten and dairy free.

Original Thumb Print Cookie Recipe:

Ingredients
1/2 c. butter
1 egg
1 tsp baking powder
2 c. flour
3 tbsp milk
1 c. brown sugar
1/2 tsp. salt
1 tsp vanilla extract
2 cups chopped walnuts

Directions
Cream together shortening and sugar. Beat in egg. Mix in salt, baking powder, vanilla and flour. Add 3 tablespoons of milk to dough. Cover and refrigerate 1 hour. Shape dough into 1 inch balls. Roll in finely chopped nuts. Depress center with thumb. Bake on greased baking sheet at 350 degrees 8-10 minutes. Remove to cool. Depress center again. Fill with jam or jelly.

Dairy and Grain Free Thumbprints with Coconut Sugar
 
Prep time
Cook time
Total time
 
Ingredients
  • ½ cup of coconut oil
  • 1 egg
  • 1 tsp baking powder
  • 2 cups of almond flour
  • 1 cup of coconut sugar
  • ½ tsp sea salt
  • 1 tsp vanilla extract
  • 2 cups chopped walnuts
Instructions
  1. Chop walnuts in food processor.
  2. Mix coconut oil and coconut sugar with hand blender.
  3. Mix in sea salt, baking powder, vanilla extract and almond flour.
  4. Roll them in chopped walnuts, put on cookie sheet and add thumbprint.
  5. Refrigerate at least a half hour.
  6. Bake at 350 in a convention oven for 10 minutes.
  7. Move to cooling rack, redo thumbprint, and then fill with your choice of jelly. Our family always uses seedless strawberry jelly.
Nutrition Information
Serving size: 4-6

Traditional Chopped Chicken Liver

Traditional Chopped Liver - Healing and Eating

My mom found locally sourced chicken liver, and I really wanted to try this recipe with her. She got the liver from the Ramsey (New Jersey) farmer’s market. Bubby, my grandmother from my dad’s side, used to make this dish, so my mom had some idea what it should taste like and how to prepare it. It was really easy. I plan on making this recipe as often as I can find grass-fed chicken livers out in LA. I’ve had trouble tracking them down so far. I love eating this with cucumber slices. It adds a freshness to a a very rich food. Plus, I regularly snack on cucumber slices with sea salt and black pepper. Since there is quite a bit of both in this dish, I thought cucumbers would be a great paleo alternative to toast.

Traditional Chopped Chicken Liver
 
Prep time
Cook time
Total time
 
Ingredients
  • 1.11 lb of chicken livers
  • 2 grass fed eggs (these were on the smaller side)
  • 1 tsp of sea salt
  • 1 tsp of black pepper
  • 1 sweet white onion
  • 1 tsp of coconut oil
Instructions
  1. Hard boil two eggs ahead of time.
  2. I greased a pan with coconut oil, I didn't want any coconut flavor so I used very little.
  3. Saute chicken liver until pink inside, about 5 minutes on each side. Feel free to chop them and check the inside. Set aside.
  4. Saute onions in leftover liver and oil bits until caramelized.
  5. Add onions, liver, and hard boiled eggs to food processor. Pulse until roughly blended.
  6. Add sea salt and black pepper to taste. Be generous. I used a lot of salt.
Nutrition Information
Serving size: 4-6


This recipe is posted on Healing with Food Friday

A Health and Wellness Blog