Category Archives: Desserts

Avocado Honey Ice Cream

Avocado Honey Ice Cream - Healing and Eating

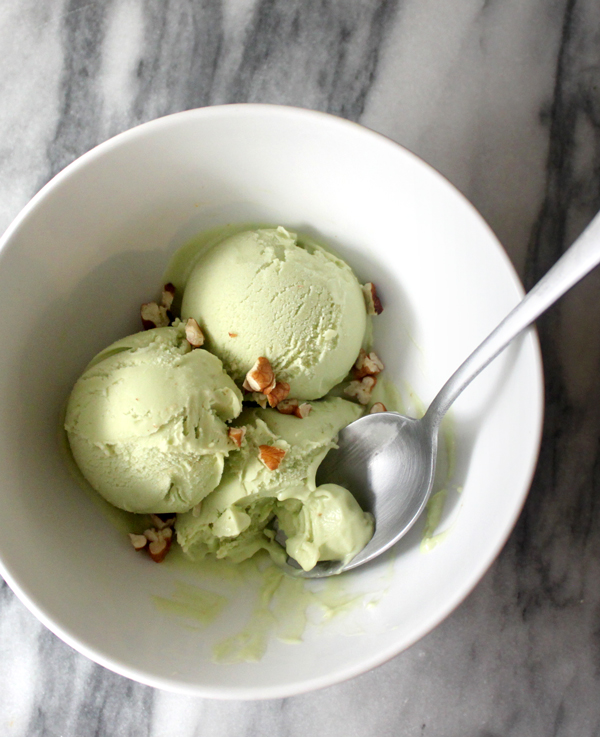
I know avocado honey ice might seem like a crazy flavor, but it was actually really delicious. The avocado taste is very mild and healthy fat gives this ice cream a nice rich texture. Make sure you use a high quality honey, since the flavor of the honey really shines through in this recipe. I’m obsessed with Honey Pacifica Creamy Wildflower Raw Honey. It’s local sourced and raw, plus the wildflower gives it a nice floral sweetness.

To preserve the lovely green color from the avocados, I made sure this ice cream is never exposed to air unnecessarily. I couldn’t help it when it was being churned in the ice cream maker (only for 18 minutes!), but when it comes to chilling the ingredients and then storing the ice cream in a freezer, use some saran wrap and push down into the mixture so there are no pockets of air. I use the same technique for storing guacamole. No air equals no browning.

Overall, I’m really happy with the way this recipe turned out and I would definitely make it again. I’m also really satisfied with my ice cream maker. It’s a Cuisinart Frozen Yogurt-Ice Cream & Sorbet Maker, and I’ve been really happy with the way my recipes have been turning out and how easy it is to make ice cream. There is just one on and off button for churning ice cream, and as long as you have the right volume of ingredients and enough fat in your recipe, the results are awesome! You need the right volume, because the churning causes the ice cream to expand and if you overfill your ice cream maker things will get messy. Without enough fat, your ice cream will have the texture of sorbet, which I don’t enjoy as much. Especially, when my goal is to make a smooth and creamy ice cram.

Avocado Honey Ice Cream
 
Prep time
Cook time
Total time
 
Author:
Serves: 1 quart
Ingredients
  • 2½ cups of full fat coconut milk
  • 1 cup of mashed avocado (about 4 small avocados)
  • ½ cup of honey (Honey Pacifica Creamy Wildflower Honey)
Instructions
  1. In a blender combine all ingredients, until smooth and silky.
  2. Then cover mixture with saran wrap, pressing into the mixture, to eliminate any pockets of air.
  3. Chill for one hour, then remove saran wrap and add mixture to ice cream maker.
  4. Follow directions on ice cream maker. Normally I have to churn the ice cream for 20 minutes, but this mixture finished sooner at about 18 minutes. The saturated fat caused it to solidify quickly.
  5. Then store in a freezer container, and again cover with saran wrap, eliminating any air pockets.
  6. Freeze overnight. When ready to serve, defrost tub for half an hour.
Notes
Use chopped raw pecans for a healthy topping.

Easy Vegan Chocolate Ice Cream

Easy Vegan Chocolate Ice Cream - Healing and Eating

This easy vegan chocolate ice cream is made with only three ingredients – full fat coconut milk, cacao powder, and dates. The fiber from the dates and the fat from the coconut milk give this ice cream a rich and smooth creamy consistency. When it came out of the ice cream maker is looked and tasted exactly like chocolate soft serve. I kept it frozen over night to get the nice round scoops, but if you love soft serve, why wait?

For healthy toppings, I added some chopped pecans, which I consider a “dessert nut” and some in season raspberries. However, the sky is the limit and you can easily get creative and throw on whatever you like.

Easy Vegan Chocolate Ice Cream
 
Prep time
Cook time
Total time
 
Author:
Serves: 1 quart
Ingredients
  • 3 cups of full fat coconut milk
  • 18 medjool dates (12 oz)
  • ⅓ cup of cacao powder
  • (optional) a handful of fresh raspberries
  • (optional) a handful of chopped pecans
Instructions
  1. Blend coconut milk, dates, and cacao powder in Vitamix.
  2. Chill mixture for at least one hour.
  3. Take out frozen freezer bowl. This should be stored in your freezer.
  4. Assemble ice cream maker according to instructions.
  5. Turn on ice cream maker and pour in mixture slowly.
  6. Turn on for 20 minutes for soft serve.
  7. (optional) Transfer to a freezer friendly container, when finished and let harden.
  8. (optional) Add toppings such as raspberries and chopped pecans

Mango Lime Popsicles with Chili Powder

Mango Lime Popsicles with Chili Powder - Healing and Eating

Popsicles, also known as paletas, are traditionally a Latin American dessert made with fresh fruit. I’m a huge popsicle fan since they are so easy to make, and are a relatively healthier option for dessert. Another common snack, or dessert, are mangos sprinkled with chili powder. So I thought why not make it into a popsicle?

Now I don’t recommend you use any old chili powder, because I don’t think it would taste good, especially if it’s heavy on the powdered onion and garlic. I use Tajin Clasico Seasoning with Lime, which is used traditionally over fresh mango or jicama and can be found in Mexican groceries stores, or amazon. There is only dehydrated lime juice, sea salt, and chili peppers in this mix so you’re getting a great blend to eat with tropical fruit.

Mango Lime Popsicles with Chili Powder
 
Prep time
Cook time
Total time
 
Author:
Serves: 10
Ingredients
  • 1 can of light coconut milk
  • 16 oz bag of frozen mangos
  • juice of two limes
  • 1 tsp chili powder (tajin clasico seasoning with lime)
Instructions
  1. Mix ingredients together in a high speed blender or Vitamix.
  2. Then scoop into popsicles molds. This mixture is a bit too thick to pour.
  3. Then cover mold and add in popsicles stick and freeze overnight.
  4. Take them out the next day, by running mold under hot water.
  5. Then sprinkle chili powder over popsicles and let them melt for 3-5 minutes.
  6. Then pop them back into freezer so chili powder stays on popsicles. Then enjoy.

Cherry Rosemary and Lemon Sorbet

Cherry Lemon and Rosemary Sorbet - Healing and Eating

If you love rosemary as much as I do, then you’ll love this delicious cherry rosemary and lemon sorbet. There is no sugar added or needed!  I used the frozen pitted cherries from Trader Joes. They are dark and sweet cherries, so you won’t get any tart flavor. I do like a bit a tartness, so I added half a lemon. Honestly, a little bit of lemon makes everything from dinner to dessert taste a tad fresher (and better!). Honestly, I was eating the frozen cherries plain, as in straight out of the bag, since they tasted so delicious.

I suggest waiting 10-15 minutes once it comes out of the freezer to make it easier to scoop. If you make a lot of ice cream or sorbet, I recommend the Tovolo Ice Cream Tub, which makes it easy to get beautiful scoops. The container is long and thin, which gives you more room to scoop your sorbet. Plus, they are BPA free. I also use the OXO Trigger Ice Cream Scoop, which easily releases the ice cream after you scoop it. Seriously, I don’t know why I waited so long to get this product. It’s been a godsend for food photos.

Finally, I wanted to give a shout out to my favorite Rosemarie! Hope you feel better! Wishing you well, while eating your namesake.

Cherry Rosemary and Lemon Sorbet
 
Prep time
Total time
 
Author:
Serves: 5-6
Ingredients
  • 16 oz (1 lb) bag of frozen pitted dark sweet cherries (from Trader Joes)
  • ½ tsp of fresh minced rosemary
  • juice from ½ a lemon
  • 1 cup of water
Instructions
  1. Blend ingredients in a high speed blender. I used my Vitamix.
  2. Then, store in a container in the freezer. Preferably overnight.
  3. Before eating, defrost 10-15 minutes. Then scoop and serve.

Paleo Brownies

paleo brownie

So, I know paleo brownies aren’t exactly healthy, but these are made without grains and dairy, and taste just like the real thing. I’ve been craving brownies lately, and I wanted to try to make own, instead of spending a ridiculous amount of money at Whole Foods. I cooked these for twenty-five minutes, but if you want them on the gooey side opt for twenty minutes. I’ve done them both ways. Cook them longer and they will taste like a fluffy chocolate cake. Under cook them, and you’ll be left with a thicker denser center, that’s soft and gooey. Sound delicious? Well, both ways are.

Instead of garnishing them with some powdered sugar on top, I sprinkle some mini Enjoy Life chocolate chips. They are so cute, and if you eat the brownies warm, the chocolate chips start to melt, and then you can lick melted chocolate off your fingers. Yummy!

Paleo Brownies
 
Prep time
Cook time
Total time
 
Author:
Serves: 4
Ingredients
  • ¼ tsp sea salt
  • ¼ tsp baking soda
  • ⅓ cup of arrowroot flour
  • ⅓ cup of almond flour
  • ¼ cup of cacao powder
  • ½ cup of coconut sugar
  • ½ cup of honey
  • 2 eggs
  • 2 tsp of vanilla extract
  • ½ cup of organic palm oil
  • (optional) ¼ cup of Enjoy Life mini chocolate chips (semi-sweet)
Instructions
  1. Preheat oven to 370 degrees fahrenheit.
  2. Mix dry ingredients in a food processor. Pulse a few times.
  3. Mix wet ingredients in a separate bowl. (Palm oil and honey may not mix that well, do your best, and it will get mixed in the food processor)
  4. Add wet mixture to food processor.
  5. Line an 8x8 cake sheet with parchment and bake for 20 to 25 minutes.
  6. (optional) Add mini Enjoy Life chocolate chips to top of brownies in last 5-10 minutes of baking.
  7. Let brownies cool before cutting into squares.
  8. Refrigerate brownies for at least two hours, preferably overnight. I don't know why, but it improves the texture, even if you under or over cooked them.

Chocolate Covered Strawberry Ice Cream

Chocolate Covered Strawberry Ice Cream

This chocolate covered strawberry ice cream is paleo and vegan friendly. I used Enjoy Life Chocolate Chips for the chocolate shell. As soon as the melted chocolate chips hit the cold ice cream, they hardened up.  This chocolate is vegan and allergen friendly, and tastes amazing. You can usually find it at your local Whole Foods.

This was my second time using the ice cream maker and I made way too much this time. Don’t overfill your ice cream maker – which I did. As soon as it starts getting too full, scoop out what you have and transfer to a freezable container, then add the rest of the strawberry smoothie mixture to the ice cream maker. Luckily, you only need to run the ice cream maker for 20 minutes, so it’s entirely possible to make your ice cream in batches.

Chocolate Covered Strawberry Ice Cream
 
Prep time
Cook time
Total time
 
Author:
Serves: 15
Ingredients
  • 1 cup of Enjoy Life Chocolate Chips
  • 1 can regular coconut milk
  • 1 can light coconut milk
  • 2 cartoons of strawberries (16 oz each)
  • 1 small can of coconut cream (5.4 oz)
  • 4 tbsp of honey
Instructions
  1. Blend coconut milk, strawberries, coconut cream. Strain out the strawberry seeds.
  2. Then blend in the honey. Use more or less depending on the sweetness of the strawberries.
  3. Refrigerate mixture for at least two hours.
  4. Take freezer bowl out of freezer, and assemble ice cream maker according to instructions.
  5. Pour mixture into freezer bowl and turn on ice cream maker for 20 minutes.
  6. When 20 minutes are finished scoop out ice cream and transfer to freezable container. Repeat until mixture is all turned into ice cream.
  7. Freeze mixture overnight, then when ready to eat, scoop ice cream into a bowl, and store it in the freezer so it doesn't melt, when making chocolate shell.
  8. On a double boiler, melt chocolate chips, then spoon that over ice cream and serve. Chocolate will harden when it hits the cold ice cream.