Mom’s Salad Dressing

Mom's Salad Dressing - Healing and Eating

This recipe is very near and dear to my heart. My mom used to make this every time she cooked dinner, which was often, so we had a side salad with our meal. It’s a very garlicy Italian dressing, that depending on the balsamic vinegar you use, can also taste pretty sweet. She also used a tsp of sugar in her recipe, but I substituted honey. The balsamic vinegar and honey give this recipe a nice sweet and sour flavor, and the garlic adds a spicy note.

In this photo, I’m using this dressing as a marinade for some veggies for an antipasto salad I’m making for dinner. I chopped up some roasted red peppers, peppadews, green and black olives, and artichoke hearts and I’m going to let all the flavors develop before I assemble the salad with the remaining ingredients: wild arugala, salami, and prosciutto. Here is the full recipe for the antipasto salad as promised.

Mom's Salad Dressing
 
Prep time
Cook time
Total time
 
Author:
Serves: ¾ cup dressing
Ingredients
  • ½ cup extra virgin olive oil
  • ¼ cup balsamic vinegar
  • 1 tsp honey
  • 1 tsp sea salt
  • 1 tbsp dried basil
  • 2 large cloves of garlic, pressed (use 3 if on the smaller side)
Instructions
  1. Mix ingredients together in a jar with lid.
  2. With the lid on, shake then serve over your favorite Italian salad.

Easy Vegan Chocolate Ice Cream

Easy Vegan Chocolate Ice Cream - Healing and Eating

This easy vegan chocolate ice cream is made with only three ingredients – full fat coconut milk, cacao powder, and dates. The fiber from the dates and the fat from the coconut milk give this ice cream a rich and smooth creamy consistency. When it came out of the ice cream maker is looked and tasted exactly like chocolate soft serve. I kept it frozen over night to get the nice round scoops, but if you love soft serve, why wait?

For healthy toppings, I added some chopped pecans, which I consider a “dessert nut” and some in season raspberries. However, the sky is the limit and you can easily get creative and throw on whatever you like.

Easy Vegan Chocolate Ice Cream
 
Prep time
Cook time
Total time
 
Author:
Serves: 1 quart
Ingredients
  • 3 cups of full fat coconut milk
  • 18 medjool dates (12 oz)
  • ⅓ cup of cacao powder
  • (optional) a handful of fresh raspberries
  • (optional) a handful of chopped pecans
Instructions
  1. Blend coconut milk, dates, and cacao powder in Vitamix.
  2. Chill mixture for at least one hour.
  3. Take out frozen freezer bowl. This should be stored in your freezer.
  4. Assemble ice cream maker according to instructions.
  5. Turn on ice cream maker and pour in mixture slowly.
  6. Turn on for 20 minutes for soft serve.
  7. (optional) Transfer to a freezer friendly container, when finished and let harden.
  8. (optional) Add toppings such as raspberries and chopped pecans

Lemon Garlic Aioli

Lemon Garlic Aioli - Healing and Eating

Although Lemon Garlic Aioli might sound intimidating to make, it is actually pretty easy. If you’ve ever made mayo, it’s a similar process to achieve the emulsification and that desirable creamy texture. I used the same oil base as my favorite coconut oil mayo, which is half a cup of extra virgin olive oil and half a cup of coconut oil. You could honestly do it with any oil, but these are my favorite paleo oils for health reasons. You don’t really taste the coconut flavor either, since the lemon and garlic easily overpower it.

The strong lemon flavor will taste delicious with any kind of seafood, although it could be eaten with anything. Lemon and garlic are flavors that are pretty common across a lot of different cuisines, and I know they are staples in my pantry. Seriously, when in doubt, buy a bag of lemons. A little bit of lemon juice makes food taste way better in my opinion.

Lemon Garlic Aioli
 
Prep time
Cook time
Total time
 
Author:
Serves: 4
Ingredients
  • 2 eggs yolks
  • ½ tsp sea salt
  • juice from 1 lemon
  • ½ cup of extra virgin olive oil
  • ½ cup of coconut oil, melted
  • 2 pressed cloves of garlic
Instructions
  1. Separate eggs to get yolks, add to food processor.
  2. Then add lemon juice, sea salt, and pressed garlic.
  3. Turn on food processor and very slowly drizzle in olive oil, then coconut oil.
  4. Store in an airtight container for 3 to 7 days
Notes
yields 1½ cups

Cauliflower and Bacon “Potato” Salad

Cauliflower and Bacon "Potato" Salad - Healing and Eating

Happy Memorial Day! I love summer picnic style food, especially since it’s so easy to make ahead. This dish I particularly love because it combines all my favorite ingredients: roasted cauliflower, bacon, homemade coconut oil mayo, and scallions. Seriously, how often do I use these ingredients. I’m surprised it took this long to throw them all together, for a very delicious, light, and surprisingly refreshing “potato” salad. The lemon flavor in the coconut oil really makes this dish shine. Otherwise, the bacon and mayo will feel too fatty and heavy. Plus, I think everything tastes brighter and definitely fresher with a little bit of lemon juice.

Cauliflower and Bacon "Potato" Salad
 
Prep time
Cook time
Total time
 
Author:
Serves: 4
Ingredients
  • 8 oz pork shoulder uncured bacon
  • 2 heads of cauliflower
  • 1 cup coconut oil mayo
  • ½ cup chopped scallions
  • 1 tbsp coconut oil
Instructions
  1. Cover a cookie sheet with foil and grease with coconut oil for easy cleanup.
  2. Chop cauliflower and roast at 350 degrees for 45 minutes to an hour or until desired firmness.
  3. Cube bacon and saute for 15 minutes or until bacon starts to brown and most of the fat is rendered.
  4. Then let bacon drain on a plate with paper towels.
  5. In a large bowl, add roasted cauliflower, bacon bits, coconut oil, and chopped scallions. Mix and smash cauliflower for "potato" salad texture.
  6. Garnish with some fresh chopped scallions and serve.

Baked Peruvian Chicken Legs & RawSpiceBar Subscription Review

Baked Peruvian Chicken

This was my first time making a Peruvian dish, and I am very happy with the results. I used a spice blend from RawSpiceBar called Peruvian Spice Rub, and it smelled and tasted heavenly. It contains smoked paprika, ancho chiles, cumin, ground black pepper, and Mexican Oregano.

RawSpiceBar is a subscription service for $6 a month that sends you a large envelope with three spice blends to try that are good for one or two dishes. Each box features a theme, and as you can probaly guess, this month features Peruvian spices and recipes. Each package contains three recipe cards featuring each of the spice blends, and a description card that gives you some background information on the cuisine and regional flavors.

RawSpiceBar Subscription

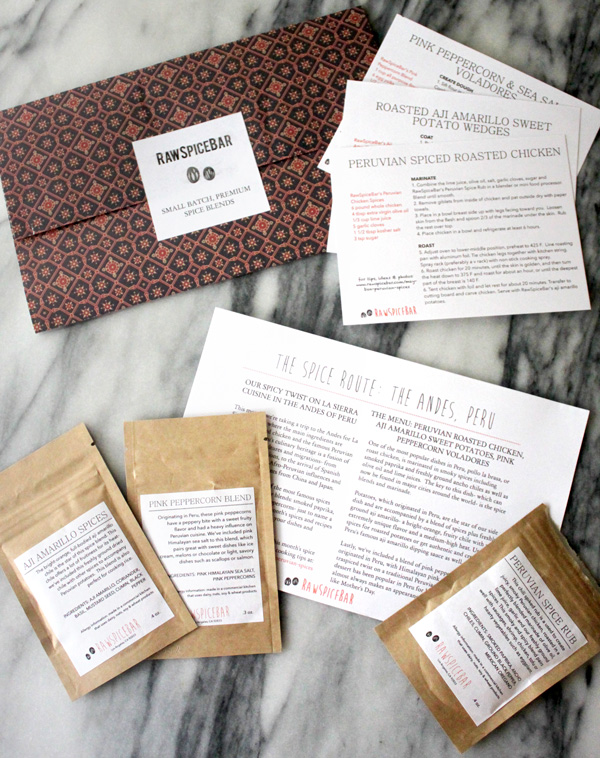
If you’re like me and love trying new spice blends, but don’t want to commit to a ful sized bottle or bag, then this would be a great service for you. At $6 a month, it’s not very pricey for some high quality samples, but keep in mind they are still samples. Don’t expect to get a large portion in each packet. That being said, it’s a great way to step outside your comfort zone in the kitchen, without making a large monetary commitment. It’s also a great way to learn more about food, and it may inspire you to create some exciting new recipes.

RawSpiceBar also gives you the option of purchasing this as a gift for a friend or family member who loves cooking. Subscription services make great gifts, because the gifts keep coming each month. At $36 you can get them a subscription for six months! Personally, I think that would be really fun to get in the mail. There is also a large social media following, so you can share your creations with the RawSpiceBar community.

Baked Peruvian Chicken Legs
 
Prep time
Cook time
Total time
 
Author:
Serves: 4
Ingredients
  • 4 skin-on bone-in chicken legs
  • 1 tsp Peruvian spice rub
  • 2 limes
  • ½ tsp sea salt
  • 1 tsp of coconut oil
Instructions
  1. Preheat oven to 375 degrees.
  2. Line a cookie sheet with foil for easy clean up and grease foil with coconut oil.
  3. Pat chicken legs dry and squeeze the juice of one lime over chicken, then sprinkle and/or rub in Peruvian spice rub.
  4. Sprinkle chicken legs with sea salt, then bake for 35 minutes at 375 degrees.
  5. Use a meat thermometer to make sure thickest part of chicken is over 165 degrees.
  6. Quarter one lime and service with finished chicken legs.

Disclaimer: I’m not being paid for this review. RawSpiceBar sent me this complimentary packet in the mail for me to try out.

Carrot Cumin Soup & Eat Right For Your Sight Review

Carrot Cumin Soup - Healing and Eating

This carrot cumin soup recipe from the Eat Right For Your Sight Cookbook was a delicious and easy one pot meal. I’m a huge fan of blended vegetable soups. They fill you up, and if you watch your weight, are usually little to no calories. I made this soup vegan and left out the Greek yogurt, but the original recipe whisks in 1/2 cup of plain Greek yogurt at the end. I also used fresh cilantro instead of cumin seeds as a garnish. I’m not the biggest fan of seeds or nuts in my soup, and I like a pop of color, so I usually use some fresh herbs and freshly ground black pepper as my garnish. What’s nice about this recipe is the flexibility. Add or leave out whatever ingredients you like. You should keep the carrots though, especially if you are worried about Macular Degeneration. Carrots contain a ton of Vitamin A, beta-carotene, and minerals.

Each recipe in the cookbook comes with a little bit of information and the nutritional profile of the dish. Not only will you want to make the recipes because they look delicious, but also because of the healthy nutrients each dish contains. To learn more about Macular Degeneration check out the website for the American Macular Degeneration Foundation. There is also a healthy vision blog party to celebrate the release of this cookbook tomorrow, May 14th.

I'm Blogging for Eye Health, #EatRightforYourSight
Eat Right For Your Sight Cookbook Review - Healing and Eating

For more details, such as where to get this amazing cookbook, check out this link.


Carrot Cumin Soup
 
Prep time
Cook time
Total time
 
Author:
Serves: 4
Ingredients
  • 2 tbsp extra virgin olive oil
  • 1 medium yellow onion, chopped
  • 2 garlic cloves, minced
  • 1 lb large carrots, chopped
  • 2½ cups of vegetable broth (low sodium)
  • ½ tsp ground cumin
  • ¼ tsp ground coriander
  • ½ tsp sea salt
  • 1 tsp fresh lemon juice
  • freshly ground black pepper for garnish
  • fresh chopped cilantro for garnish
Instructions
  1. In a saucepan, heat olive oil over medium high heat and saute the onion for a three minutes, then add garlic and saute for another minute.
  2. Add carrots, broth, cumin, coriander, and sea salt. Bring to a boil.
  3. Then reduce the heat and cover and let simmer for fifteen minutes, or until carrots are tender.
  4. Then transfer soup to a high speed blender, add some fresh lemon juice and puree until smooth.
  5. Ladle into bowls and sprinkle with fresh ground pepper and chopped cilantro.


Recipe from Eat Right For Your Sight: Simple Tasty Recipes That Help Reduce the Risk of Vision Loss from Macular Degeneration, By Jennifer Trainer Thompson and Johanna M. Seddon, copyright © American Macular Degeneration Foundation, 2014. Reprinted by permission of the publisher, The Experiment. Available wherever books are sold.

A Health and Wellness Blog