I’m really excited to offer you guys my first giveaway. Juice It Up has given me $20 in gift cards, which I will be giving to one lucky follower. Although I love juices, I still haven’t splurged on a juicer. I have a great Vitamix for smoothies that I use regularly, but I prefer the convenience of ordering a juice every now and then. I try to make sure they are low in sugar and in fruit to get the most nutritional and health benefits. Don’t be afraid to ask them for exactly what you want. I’ve customized many juices and smoothies, even when they’re not advertised as such. Everyone has different health needs and it’s important that you stand up for them. Not that you will need to at Juice It Up, they’ve got some awesome green and vegetable juice blends including the Immunizer and the Healthy Heart.
This did cave in a little the next day, but it was fluffy when it came right out of the oven, which in my opinion is the best time to eat it. Baking with almond flour can be a little tricky since it’s much heavier, and your finished product will be denser. However, since it’s made with eggs and almonds it will be much more filing compared to many baked good recipes. In fact, I think of a slice of this as a cleaner alternative to a protein bar. I’ve been working out more, so I’ve upped the amount of gluten free baking in my diet so I don’t lose more weight. I got fitted for my wedding dress and I need it to fit me. Which can be difficult on a low sugar paleo diet, since this diet tends to make people lose weight…obviously 🙂 That’s why it’s so popular right now.
Mix dry ingredients (baking soda, almond flour, sea salt, and cinnamon) in one bowl, and wet ingredients (eggs, honey, and mashed bananas) in another.
Melt coconut oil over stovetop. Then slow whisk/mix in the coconut oil with the wet ingredients. Be careful and go slow. You don't want scrambled eggs.
Combine wet and dry ingredients, then pour into a greased pan.
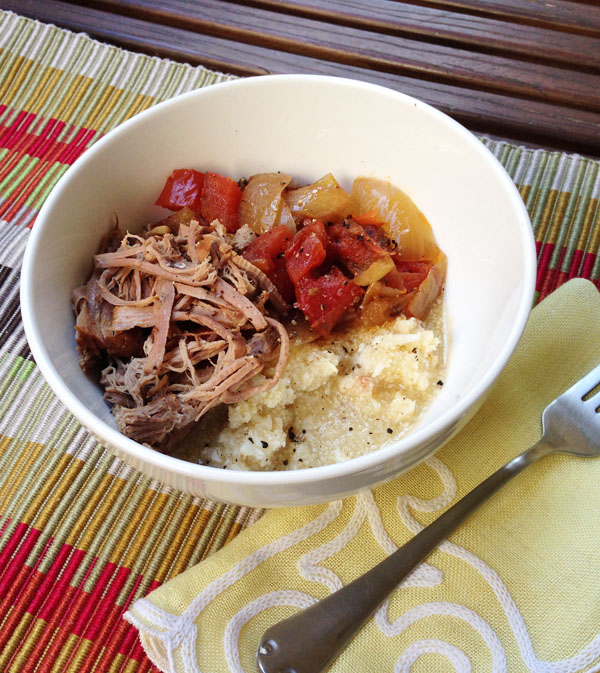
I’m really happy with the way this came out. It’s not very spicy so if you may need to add in another pepper or more chili powder. I paired the slow cooker beef and veggies with some cauliflower cous cous. It’s really easy to make, just put cauliflower into the food processor, and watch it get pulverized. Then, saute it with some stable cooking oil or broth, or even eat it raw. I barely cooked mine, but then ended up mixing it with the slow cooker vegetables and beef to make a big mashed mess. It tasted awesome though, and texture reminded me of grits. Maybe I should rebrand this as a Mexican breakfast? Put a poached egg over it and it would be breakfast for sure!
It’s my blog’s first birthday! It was actually March 4th, but time has flown by so fast that I almost missed it! I’m really proud of the work I’ve done this year. I’ve guest posted for Answers.com, I’ve had a couple photos on foodgawer, and I’m part of a few food blogging websites where my recipes get posted. I’ve also met a lot of cool food bloggers online and I’m really lucky to be a part of their facebook groups and community cookbooks. I would love to get my own cookbook out in the next year, hopefully one that has a print version!
Once again, thank you so much for your support, it’s really means a lot. I’m so excited for the next year, and hope you continue to enjoy my kick-ass recipes (can you tell I’m proud of them?) and my super helpful health articles. I’d love to hear your feedback on what you liked, what you disliked, and what you want to see for the next year. That way I can get a better idea what to focus on. Personally, I love creating new paleo recipes. In fact, I have one slow cooking right now…get ready for it…Slow Cooker Southwest Shredded Beef. I love my slow cooker, so plan on more of those recipes. I’m currently reading an awesome cookbook called All About Roasting by Molly Stevens, so plan on some crazy good oven recipes too! Later, health nuts!
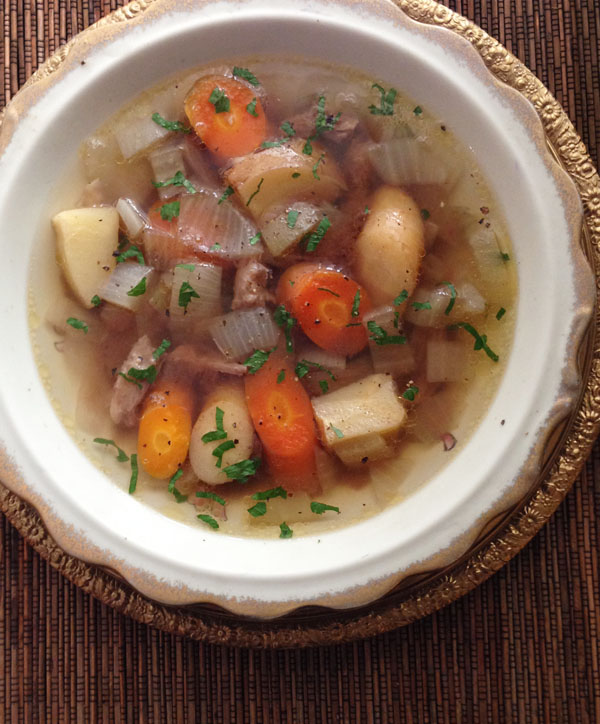
It’s a shame this soup isn’t more popular, because it’s full of nourishing gelatin, and it tastes amazing. It smells good too. I was literally standing over the slow cooker smelling it, while I waited for it finish cooking. I hope you love this as much as I do!
Defrost oxtail, the slow cooker will eventually defrost it if you forget this step.
Throw all ingredients into the slow cooker. Then fill rest of slow cooker with water.
Cook on high for 6 to 7 hours or low for 9 to 10 hours.
Add salt and pepper to taste.
Scoop out oxtail bones, and let them cool enough for you to handle.
Then peel and/or chop as much meat off as possible. This is the tough part, pun intended since there is not much meat and some of it may be tough. Do your best. Then add meat back into soup.
These beautiful strawberries were on sale at Whole Foods, so I had to grab them. I’ve been wanting to attempt a berry pie for a while now. Thankfully, it’s practically summer here is LA and strawberries are back in season. This was my first attempt with tapioca flour and I’m really happy with the way it thickened up the filing. It’s made from the roots of manioc plants, which are sometimes called cassava, yuca, and singkong and are native to South America. I bought the Let Do…Organic Brand, and was very happy with the results.
5 cups of strawberries (set aside 1 cup for top of pie)
2 tbsp of creamy wildflower honey
⅓ cup of water
2 tbsp of tapioca flour (Let's Do...Organic Brand)
1 tsp fresh lemon juice
¼ cup of water
Instructions
Prebake a pie crust. I used almond flour for mine since it's gluten free and paleo.
While crust is baking, use a paring knife to hull strawberries. Then slice vertically to get pretty slices.
Set aside one cup of strawberries, sprinkle the other four cups with tapioca flour.
In a saucepan, combine the strawberries with the tapioca flour, honey, water, and lemon juice.
Stir and simmer until it thickens to a watery jelly like consistency. Then add filing to pie crust.
Add remaining one cup of strawberries to top of pie, so your pie doesn't look too mushy. I like to push the uncooked strawberries down a little, so they get a little of the jelly glaze and fit in with the rest of the strawberries.