I jazzed up Nonni’s cauliflower soup with some bacon and chives as a garnish, but don’t be fooled, this soup is really easy. It’s basically just steamed cauliflower that’s been blended, which surprisingly tastes fantastic with just a little bit of fresh ground black pepper. If you don’t have time to make some bacon, or chop chives, all you need is some black pepper and you have a delicious and healthy meal that’s got no calories. You can steam and blend it in bone broth if you have some, for some extra nutrition, but I just used water. It tastes good either way and cauliflower only taste 20 minutes to steam, which means this meal can be done in under 30 minutes. If you’re entertaining, add the bacon and chives, it will make it look extra pretty for your guests.
If you are garnishing with bacon, bake bacon in the over for 12-15 in the oven at 350 degrees. Then, drain on paper towels and chop one piece and set aside for garnish later.
Chop cauliflower and add to pot with water and cover for 20 minutes, until cauliflower is soft.
Transfer cauliflower to a high speed blender and blend with sea salt. Then, transfer blended cauliflower back to the pot.
If you are garnishing with chives, chop a small amount and set aside.
Then spoon blended cauliflower into bowls.
Add chopped bacon and chives to bowls, then sprinkle some fresh ground black pepper over soup and serve.
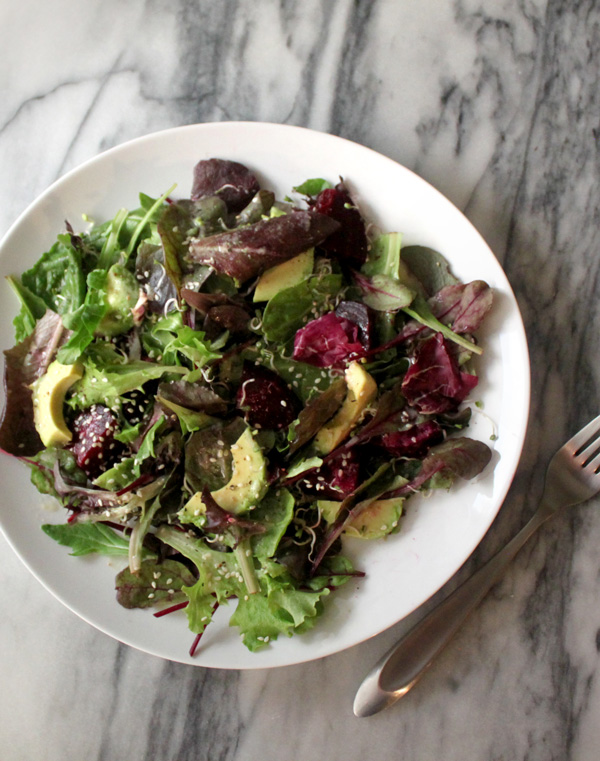
This beet and avocado salad with a tahini dressing was inspired by my favorite salad at Akasha in Culver City. I usually get it with a side of bacon for brunch. The beets will satisfy your sweet tooth and the generous slices of avocado will keep you full and satisfied. At Akasha, they use sunflower seeds instead of sesame seeds, but I wanted to emphasize the sesame in the tahini dressing.
I added some broccoli sprouts as well for some added nutrition. If you don’t like the taste of broccoli sprouts, don’t worry, the avocado will mellow the flavor and the dressing will disguise it. A salad with lots of avocado is my favorite way to sneak these nutritional powerhouses into my diet.
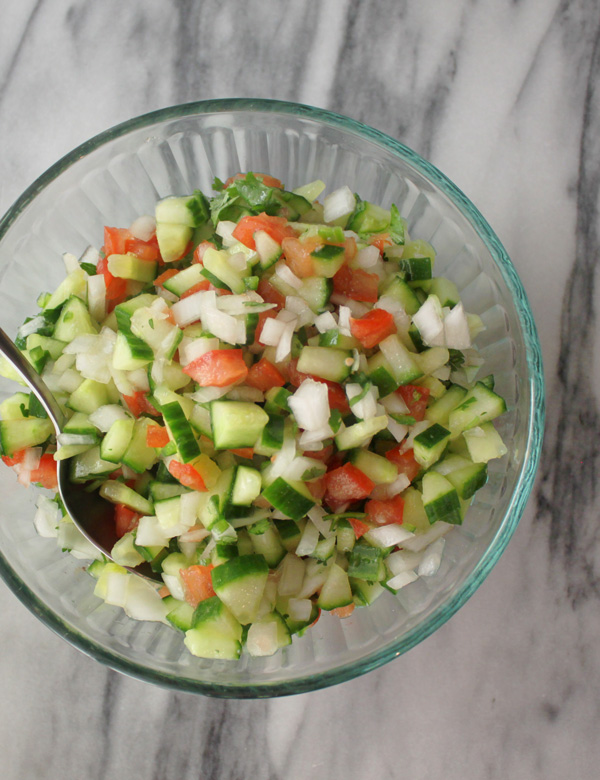
Kachumber is like an Indian version Pico de Gallo, and just happens to be one of my favorite sides with fish or chicken. This recipe makes a ton, which isn’t an issue for me, since I can’t get enough of it, but you might want to prepare this for a large group. It’s really spicy with raw serrano chilies in it, so be careful! You are now warned. I recommend dicing the serrano as fine as you can, so your friends and family don’t get large pieces.
You can also add this on top of soups or over a heavy curry dish for some added fresh and spicy flavor. Throw it over some lettuce and you have an easy salad. Trust me, if you like spicy food, you will want to add it to everything.
This chocolate covered strawberry ice cream is paleo and vegan friendly. I used Enjoy Life Chocolate Chips for the chocolate shell. As soon as the melted chocolate chips hit the cold ice cream, they hardened up. This chocolate is vegan and allergen friendly, and tastes amazing. You can usually find it at your local Whole Foods.
This was my second time using the ice cream maker and I made way too much this time. Don’t overfill your ice cream maker – which I did. As soon as it starts getting too full, scoop out what you have and transfer to a freezable container, then add the rest of the strawberry smoothie mixture to the ice cream maker. Luckily, you only need to run the ice cream maker for 20 minutes, so it’s entirely possible to make your ice cream in batches.
Blend coconut milk, strawberries, coconut cream. Strain out the strawberry seeds.
Then blend in the honey. Use more or less depending on the sweetness of the strawberries.
Refrigerate mixture for at least two hours.
Take freezer bowl out of freezer, and assemble ice cream maker according to instructions.
Pour mixture into freezer bowl and turn on ice cream maker for 20 minutes.
When 20 minutes are finished scoop out ice cream and transfer to freezable container. Repeat until mixture is all turned into ice cream.
Freeze mixture overnight, then when ready to eat, scoop ice cream into a bowl, and store it in the freezer so it doesn't melt, when making chocolate shell.
On a double boiler, melt chocolate chips, then spoon that over ice cream and serve. Chocolate will harden when it hits the cold ice cream.
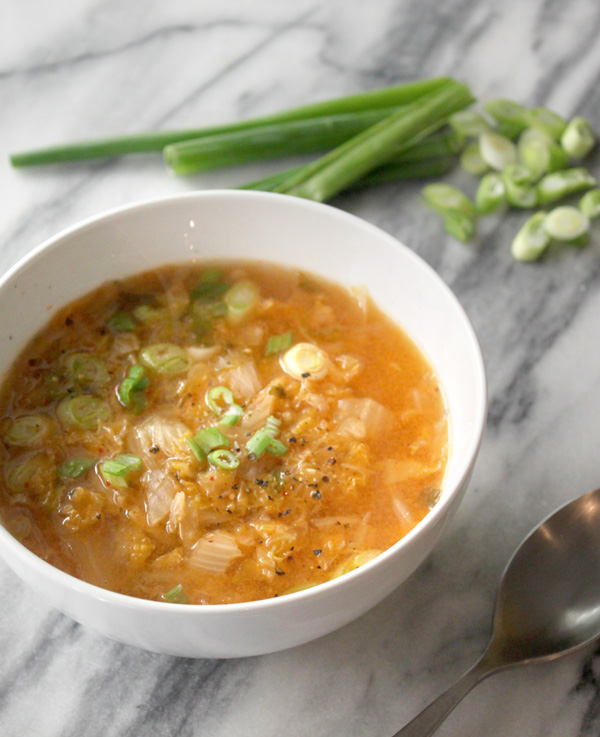
This kimchi soup is an easy and delicious paleo friendly meal. Chances are you already have all the ingredients in your fridge. I used some leftover chicken bone broth, a jar of kimchi, some chopped scallions (aka green onions) and a little bit of honey. I know some of you guys might not want to add the honey, but I highly recommend it. It gives the broth a nice sweet and sour flavor, otherwise you’ll just be drinking a sour broth. Not so yummy. Plus with all the cabbage from the kimichi, there is plenty of fiber so you don’t need to worry about 2 tbsp in the whole recipe, which serves 2-4. Two if you go back for seconds 🙂
I can’t take credit for this one. Shameer ‘s Game Day Scramble is my husband’s invention and specialty. Although we’re not avid sports fans (sorry only sci-fi and fantasy nerds here), we love stadium food! When Shameer discovered grass-fed nitrate-free hot dogs at Whole Foods, we started eating them again … as a scramble! This way we could ditch the bun for eggs. Plus, I love breakfast food, even for dinner. Serve it with some raw dill pickle sauerkraut (by Farmhouse Culture) and some paleo friendy BBQ sauce (Peach BBQ by Steve’s Paleogoods) or homemade ketchup. The scramble itself only takes 5 to 10 minutes at most to make, so it’s an easy weeknight meal too or a fast breakfast option in the morning. It tastes just like the real thing, trust me you won’t miss the bun.